Parts needed:
1) Desolder the old ROM chip. This is the one marked "CO24922". If you haven't desoldered chips before, get some practice or buy a pizza and split it with a friend who has. Also suck the solder out of the four extra holes.
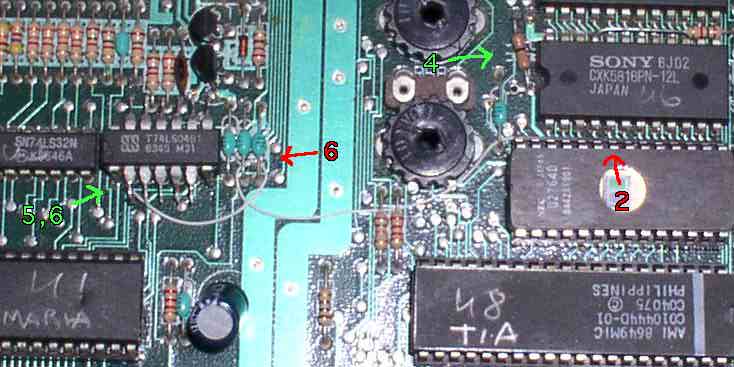
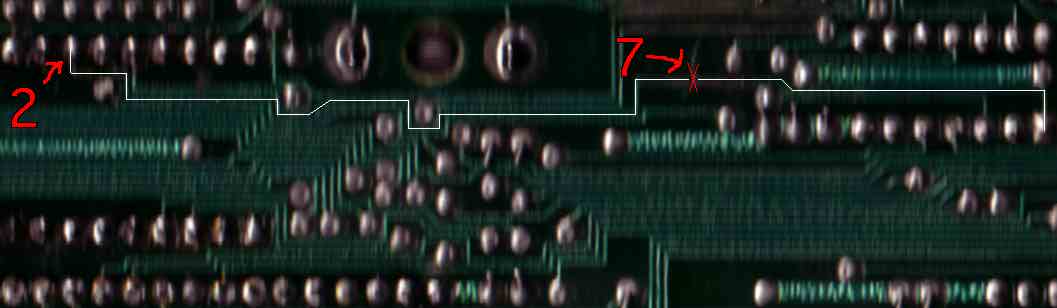
2) Strip one end of the wire wrap wire and put it into the pin 22 hole. This is the one to the "right" of the letters "DBM".
3) Insert the 28 pin socket into the holes and solder it down, along with the wire wrap wire. Test your work by putting the ROM chip back in and plugging in a 7800 game. If the "ATARI" screen comes up and then the game starts, everything is okay.
4) If you are going to be using a 28 pin EPROM chip, suck the solder out of the holes marked "W1" and desolder the resistor-like thing from the adjacent holes (which are marked "W2"). It may look like a resistor, but if it is, it's zero ohms. Solder the resistor-thing into the W1 holes.
5) Take the 74LS04 chip and bend up all but the four "corner" pins (1, 7, 8, and 14). Piggyback it over the 74AHCT08 or 74LS08 chip which is just above the biggest chip on the board. Solder down pins 1, 7, and 14. Now bend up pin 8.
6) Strip off the other end of the wire wrap wire and wrap the end around pin 2 of the 74LS04. Before putting it on the 74LS04, thread it under some resistors and capacitors to keep things tidy. Solder the wire to the pin.
7) Find the trace on the bottom of the circuit board that goes between pin 1 of the 7408 and the ROM pin that you stuck the wire wrap wire into. There is a place next to the 7408 where you will have enough room to cut the trace safely. Cut it.
8) Program a 2732, 2764, or 27128 EPROM (or a 28xxx EEPROM if you prefer) with a copy of the 7800 ROM in the last 4K.
9) Put the ROM into the socket and test everything by plugging in a 7800 game. Now you're done!